Wednesday, December 12, 2018
Bijles wiskunde, natuurkunde en scheikunde in Utrecht
Hallo allemaal, ik geef sinds kort bijles in wiskunde, natuurkunde en
scheikunde voor Havo en VWO. Als je zoon, dochter of misschien jijzelf
bijles in deze vakken kan gebruiken en je komt uit Utrecht ga dan naar www.bijles-in-utrecht.nl. Daar staat meer informatie over de bijles en hoe je deze kunt aanvragen.
Monday, October 22, 2018
Moving from Blogger to WordPress (Bye bye Google)
Bye bye Google
With the demise of G+ I started thinking about all other Google services that I was using. I also wondered what the risk would be if Google would shut down Blogger, GMail or Google Drive. Instead of hoping for the best I plan for the worst so in following months I will stop using all Google services. Since I'm a free and open source advocate I will replace these services with free and open source services. My first move will be to move my blog from here to WordPress. I already have a WordPress blog but I wasn't using it much but that's about to change. For those interested you can continue to follow me on Homehack. I will continue to blog about open source, 3D printing and 3D CAD and more so hopefully I will see you there.Friday, August 10, 2018
OpenSCAD: Camera case for the Raspberry Pi camera module
Introduction
At the end of 2015 I placed a DIY security camera in our house with a view on our backyard. The camera consists of a Raspberry Pi model B and a 5MP camera board module (It's been replaced by a 8MP version). I used Motion, a very flexible program that monitors video signal, on top of Raspbian. It worked all these years without problem but over time the wooden case that I made was starting to fall apart. I therefore decided to create a 3D printed camera case to replace it. I also wanted to use this opportunity to eliminate the problem of glare on sunny days.
Design of the Camera Case
The camera case consist of five parts. A back and a front of the case, a camera holder and lens to protect the camera module and easily insert it into front of the case, and a lens hood to prevent glare. I used OpenSCAD, a free and open source program to design 3D CAD models. The Constructive Solid Geometry properties of OpenSCAD are excellent for these kind of designs. The back case has mounting points for the Raspberry Pi. I use the Raspberry Pi B but the mounting points are easily changed for other Raspberry Pi models, in fact I already added the coordinates for some other models.I updated the design with stop ring for the lens module to prevent the lens to slide into the camera a little so this is a link to version 2. If you want to make the case yourself or just want to tinker with it here is a link to the OpenSCAD file: https://drive.google.com/open?id=1qJ7picRoSDI_HNSntF7nptrMazSRV3FF
Thursday, April 5, 2018
Maintaining the Raspberry Pi Squeezebox server (aka Logitech Media Server)
Introduction
I wrote earlier about the Logitech Media Server (LMS), open source software that I've used to turn a Raspberry Pi into a music server for my Squeezebox devices. I'm using my Raspberry Pi based Logitech Media Server a couple of months and I've grown very fond of it. What started as an experiment now has become a device I'm starting to rely on. I guess that eventually I have to replace it with something like the WD PiDrive Node Zero. In the meantime however I do need to maintain the LMS. In this blogpost I'll explain how I add and remove music files from the LMS and create a simple backup of your music files. Finally I provide a tip to debug problems with the Logitech Media Server. All software that I used for this project is free and open source. |
| My Raspberry Pi turned into an LMS with 3D printed case on my desk. |
Adding, changing and deleting music files
I partly ripped my CD collection and still add new albums. All the ripping is done on my Thinkpad T40 laptop using Asunder, a low resource ripper for Linux, on the Puppy Linux operating system. In the beginning I unmounted the USB hard disk from the LMS, removed it and connected it to the laptop and copied the new albums. This proved to be be a clumsy method and I quickly found myself looking for an alternative.I decided to use FTP to transfer files over the network to the Raspberry Pi. FTP is a network protocol to transfer files between a client and a server. The software that I'm using is either FileZilla or gFTP. They have basically the same functionality but gFTP is not available for Windows while FileZilla is available for GNU/Linux, OSX and Windows. Working with both is easy enough the only problem that I had was to set the ownership for the USB hard disk on the Raspberry Pi. Only root was able to write to the disk. The reason is a bit technical and maybe confusing but I had used the Windows FAT filesystem for the USB hard disk and when I mounted it on my Linux laptop (Puppy Linux distro), ownership of all files was changed by Puppy Linux to root. At this point it was impossible to change ownership and permissions with chmod and chown from the media server. To solve this problem I had to unmount and mount the USB hard disk using the following general command:
mount device mount-point -o uid=foo -o gid=foo
or in my case
mount /dev/sda1 /media/usb-drive -o uid=pi -o gid=pi
This command sets the ownership of all files on the USB hard disk to pi instead of root enabling me to use FileZilla and gFTP.Creating a backup of the music collection
I invested a lot of time in ripping my CD collection so it would be a shame if I lost my music files due to a hard disk crash. I therefore use a very simple backup method, largely copied from the Raspberrypi.org website to ensure that my files are safe.
cd /home/media/usb-drive
sudo tar czf usbdrive.tar.gz
This creates a file 'usbdrive.tar.gz' that contains files in /media/usb-drive, the mounting point of my USB drive and places it in the same map. Next I use (again) Filezilla to move the backup file to my desktop computer.sudo tar czf usbdrive.tar.gz
Debug problems with the Logitech Media Server (tip)
I didn't encounter much problems with the LMS but if you do take a look into the log file of the server. This can be done opening a terminal on your PC and login into the Rasperry Pi with:
ssh pi@<your_network_ip_address_of_the_server>
cat /var/log/squeezeboxserver/server.log
The sudo ssh command prompts for the password of the Raspberry Pi. Now look for anything suspicious in the log, copy it and do an internet search with your preferred search engine. Chances are someone already encountered the same problem.cat /var/log/squeezeboxserver/server.log
Earlier posts about the Logitech Media Server:
Setting up a Raspberry Pi Logitech Media Serverhttps://eribuijs.blogspot.nl/2017/08/creating-raspberry-pi-squeezebox-server.html
3d printed enclosure for the Raspberry Pi Logitech Media Server
https://eribuijs.blogspot.nl/2017/11/raspberry-pi-squeezebox-server-with-3d.html
Thursday, February 15, 2018
OpenSCAD: A Curved 3d Printed Lithophane
Important
This blog post has been reposted and updated on my current blog: https://homehack.nl/a-curved-3d-printed-lithophane-in-openscad/. You'll find the accompanying OpenSCAD file there too.
Introduction
How can I wrap a flat surface around a cylinder in OpenSCAD. This was a question I asked myself. OpenSCAD doesn’t provide a ready made method so we need to write our own. Luckily we don’t have to invent the wheel here, others have done that already. Justin Lin has written a very handy tutorial on his website Openhome.cc how to wrap a text around a cylinder. In this project I took it a step further and wrapped a png image over part of a cylinder resulting in a curved image.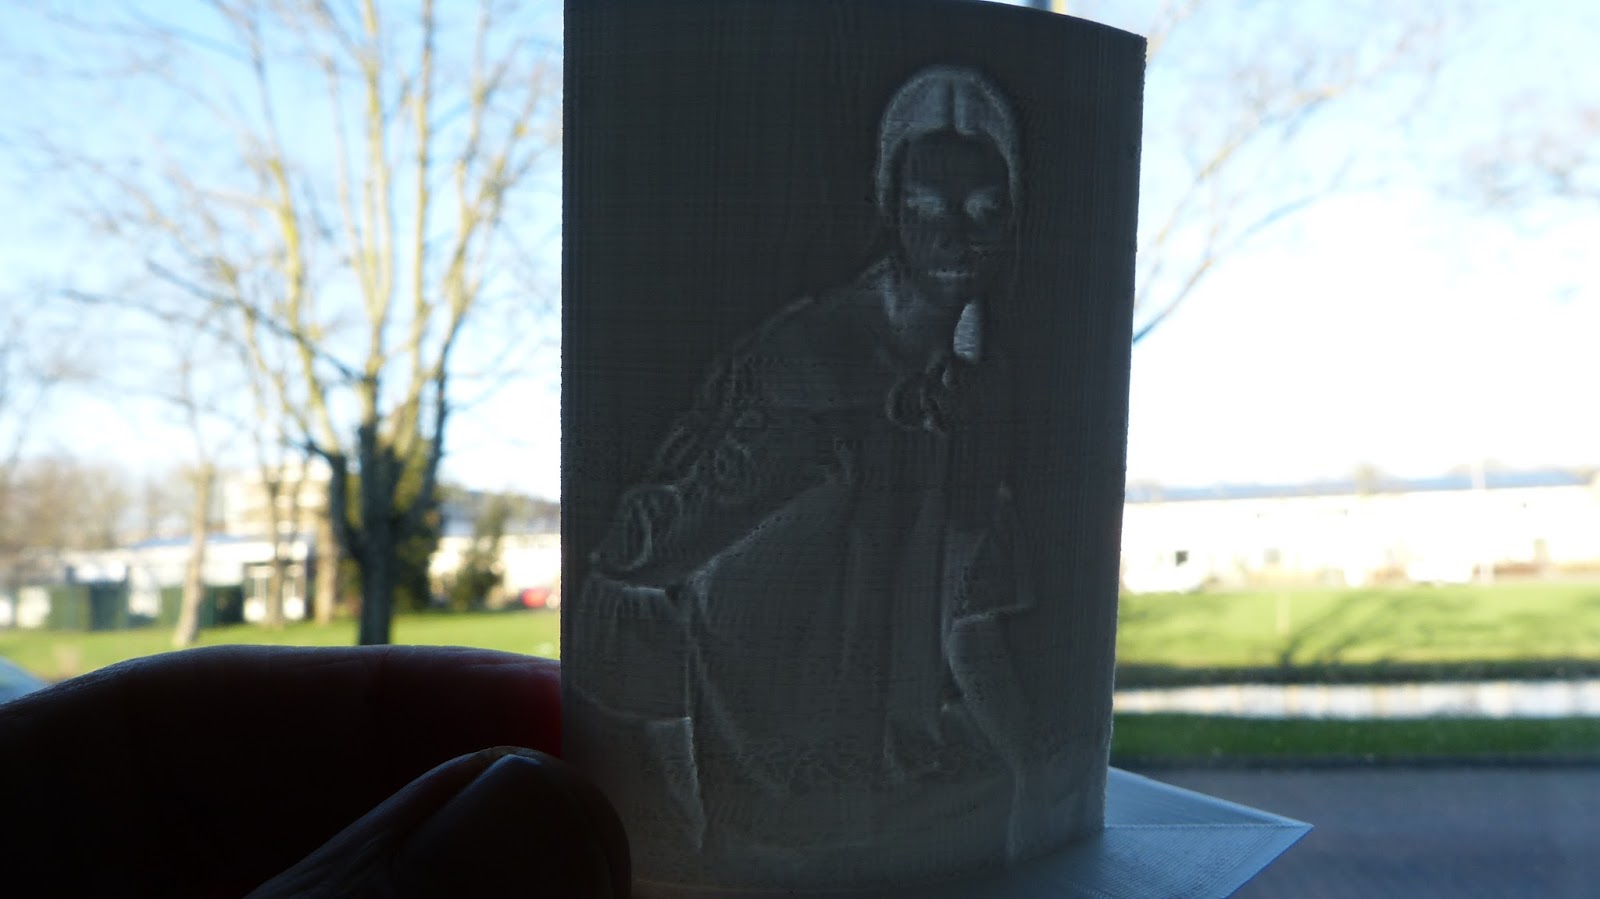 |
| 3D printed curved lithophane |
Curved lithophane
It seemed like fun to combine this technique of wrapping with the 3D print of a lithophane. A lithophane is an engraved image on translucent material. Many 3D printers have already produced lithophanes sometimes with stunning results. For this experiment I’ll use white PLA because it has excellent translucent properties.Now first let me explain the basics on how to wrap a 2D image around a cylinder. First we create a circle out of triangles. These triangles are then extruded to segments to form a cylinder. Next all segments of the cylinder are lined up in a row and the image is place on the far side but just within the limits of the segments. When we intersect the image with every individual segment and return the segments to their original position in the cylinder, a curved image emerges (see images below).
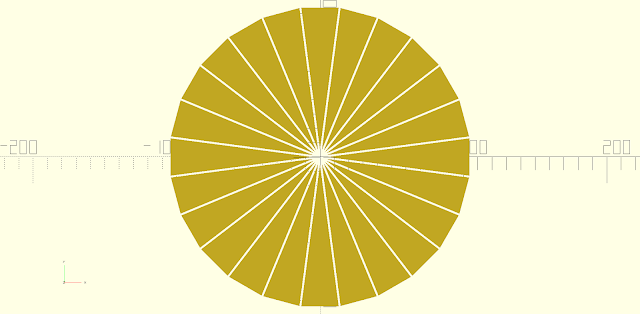 |
| A circle created out of triangles |
 |
| The extruded triangles form a cylinder |
 | |||
| The segments are lined up in a row |
 |
| Image placed on the far side of the triangles |
 |
| The triangles returned to their original positions |
 |
| The image intersected with the triangles and returned to their original position. |
If you want to know more please watch my video. In this video the OpenSCAD script is explained and demonstrated. Also is shown how to import the stl file in Cura and what settings are used.
Thursday, December 14, 2017
OpenSCAD: Generating Triangles and Poyhedron
Polyhedron, vertices and faces
OpenSCAD offers three methods to make 3D model. First is Constructive Solid Geometry where primitive objects are combined using boolean operations. The second method uses two dimensional shapes that are extruded either in the z direction (linear_extrude)) or around the the z-axis (rotate_extrude). In the third method vertices (or points) and faces are defined to shape the surface of a 3D model (polygon mesh). This, at least in theory, provides us with a method to create the most complex 3D shapes.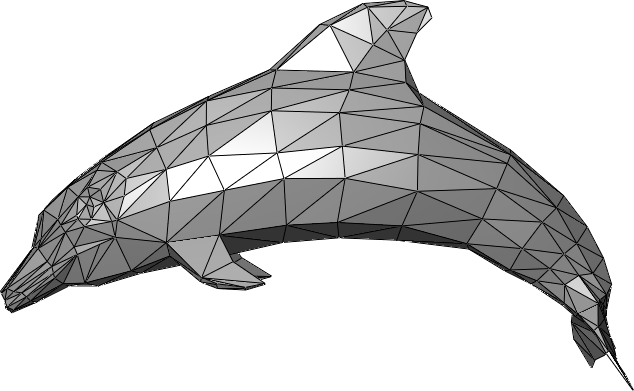 |
| Polygon mesh of a dolphin. In this example a triangle mesh is used. A public domain image from Wikipedia (https://en.wikipedia.org/wiki/Polygon_mesh#/media/File:Dolphin_triangle_mesh.png) |
The third method can be achieved with the polyhedron function of OpenSCAD. The description polyhedron function in the OpenSCAD manual is more than adequate but it only provides the user with examples where the vertices and faces are manually entered in OpenSCAD. This can be a cumbersome process that is prone to bugs, leading to a non-valid solid. Having OpenSCAD generate these vertices and faces is a method that is more favorable (at least to me) for two reasons. First once the algorithm is correct the chance to generate non-valid solids is minimized but more importantly computer is so much faster in calculating the vertices needed.
Triangle mesh of a sphere
An important question is what kind of faces are needed for our polygon mesh. From OpenSCAD version 2014.03 onward a face description can have any number of vertex larger than two however I think that the triangle mesh is still the best choice. If the user chooses more than three vertices OpenSCAD subdivides the faces to triangles and this can cause problems as is demonstrated in an article of Justin Lin where a cube that consist of four vertex faces and one of the faces is not planar with the other three. So in conclusion the triangle mesh provides the best control over the 3D model in OpenSCAD.In the following video tutorial I'll explain how to create such a 3D model of a sphere, cone, torus and cylinder in OpenSCAD.
Wednesday, November 1, 2017
Raspberry Pi Squeezebox server with 3d printed enclosure
The need for a enclosure
Back in August I created a Squeezebox server using a Raspberry Pi 2 and a USB harddrive I had both lying around. I quickly had the server up and running and I'm using it ever since but I didn't have a enclosure. A 3D printed enclosure would enable me to give the server a more permanent place and at the same time I'm getting rid of these components and cables lying around on my desk.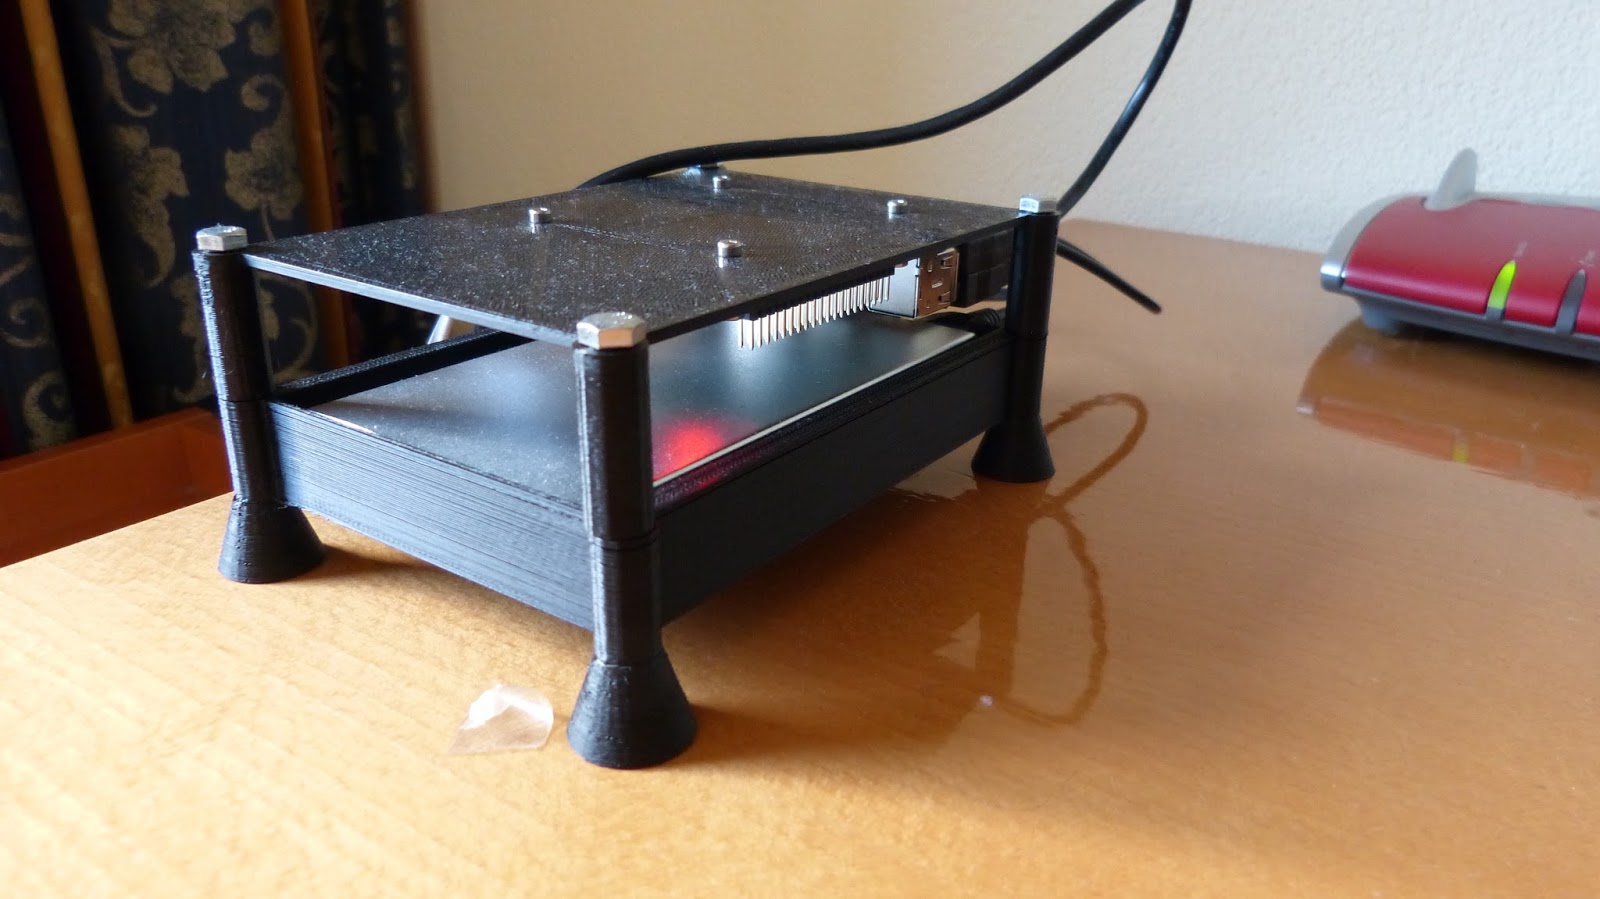 |
| The Squeezebox server sitting nicely into the 3d printed enclosure that I designed for it. |
Solvespace for the enclosure
As a 3D CAD tool to design the enclosure I choose Solvespace. Solvespace is free and open source available for Windows, OSX and Linux. I use Solvespace a lot and it has it's limitations but I felt it was fully capable for this job and indeed it didn't disappoint. Before starting I made a couple of simple drawings with pen and paper, I measured the size of the harddisk and the Raspberry Pi. I also used a template for the Raspberry Pi mounting holes that I found online.With all this information I started drawing with Solvespace. The power of Solvespace (and other 3D CAD programs) is that's it's very easy to make changes to the 3D design. While working on the design I noticed that USB harddisk can become hot so I figured it needed to be cooled. In the drawing I elevated the harddisk a bit by adding four supports one on each corner of the disk and made four ventilation slots in the bottom of the enclosure thus allowed air to flow freely around the harddisk. The Solvespace files of this enclosure are here. Make sure to adjust the size to the USB HDD you're using.
 |
| The 3D design I came up. The printed parts, bottom and lid, are grey, the green part is the Raspberry Pi and the red part is the USB harddrive. |
3d printing and assembly
I printed all the parts on my Hephestos 2 printer using black PLA filament and the result looks pretty good. Assembly of the parts is simple. First I used 2.5mm bolts and nuts to mount the Raspberry Pi upside down to the lid of the enclosure. Next I insert the USB HDD into the bottom placing it on the elevated supports. The enclosure is fastened with four bolts 5x60mm and 5mm nuts. The nuts fall nicely into the hexagonal cavity of the feet. Finally the USB cable of the HDD is connected with the Raspberry PI and the ethernet cable is connected from my router to the Pi. The server has run for several weeks in the 3d printed enclosure without any problem. For those that want more information I made a YouTube video about this project.
Subscribe to:
Posts (Atom)